java权限认证框架介绍和使用
1. 安全框架
即解决系统安全问题的框架,如果没有安全框架,我们需要手动去处理每个资源的访问控制,非常麻烦,使用安全框架,我们可以通过配置的方式实现对资源的访问控制。
2. 常用安全框架
- Spring Serurity:Spring家族的一员,是一个能够为基于Spring的企业应用系统提供声明式的安全访问控制解决方案的安全框架。它提供了一组可以在Spring应用上下文配置的Bean、充分利用了Spring IOC、DI(控制反转,依赖注入)和AOP(面向切面编程)功能,为应用系统提供声明式的安全访问控制功能,减少了为企业系统安全控制编写大量重复代码的工作。
- Apache Shiro:一个功能强大且易于使用的Java安全框架,提供了认证,授权,加密和会话管理。
3. Spring Security
高度自定义框架。
1. SpringSecurity使用
- 加入依赖
<!-- spring security 安全框架 --> <dependency> <groupId>org.springframework.boot</groupId> <artifactId>spring-boot-starter-security</artifactId> </dependency> - 启动项目
- 访问接口
控制台显示:

页面显示:
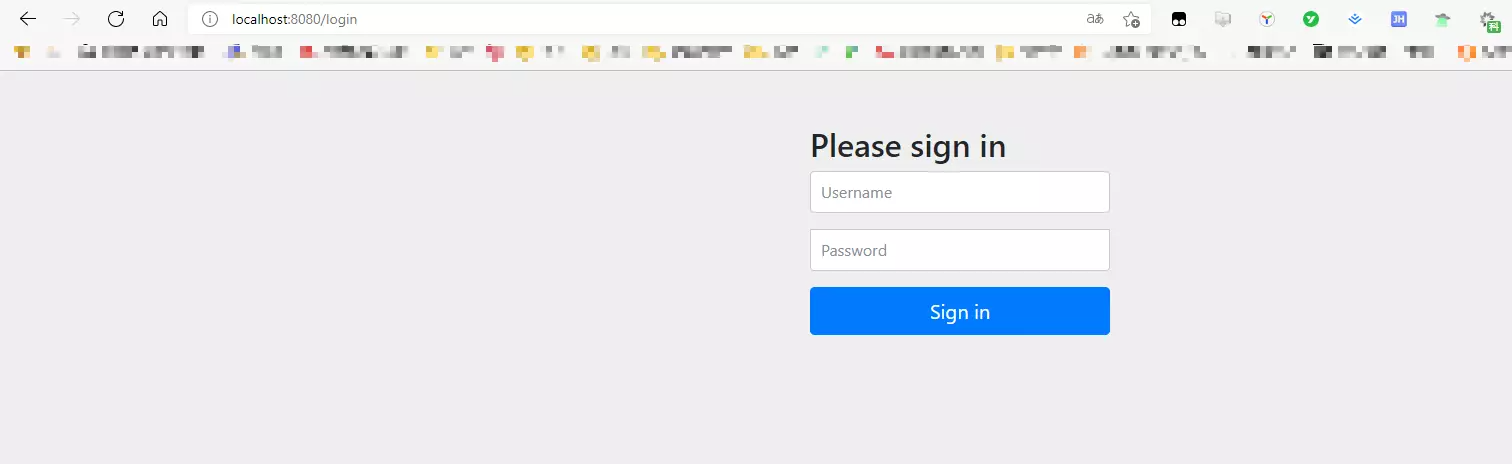
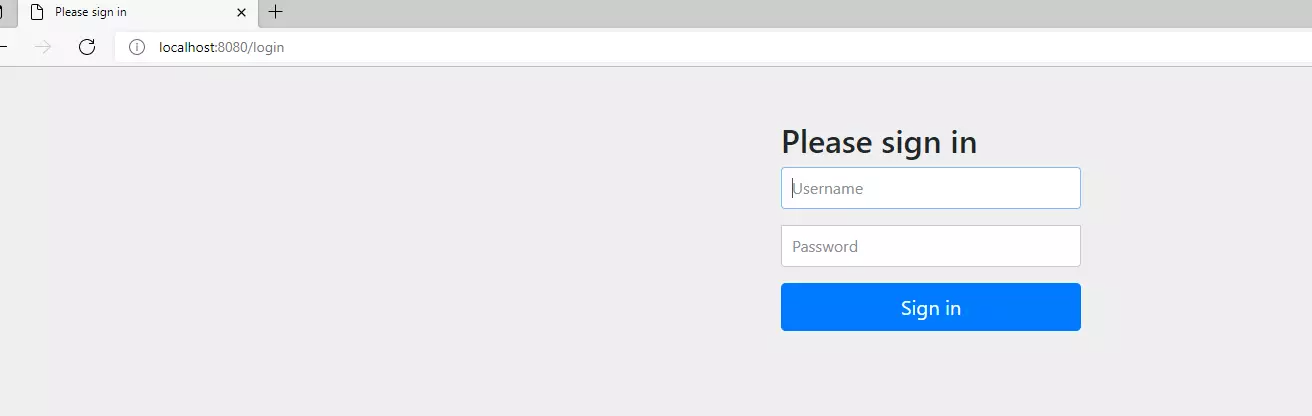
- 账号是user 密码为控制台的密码,只有登录之后才能访问接口
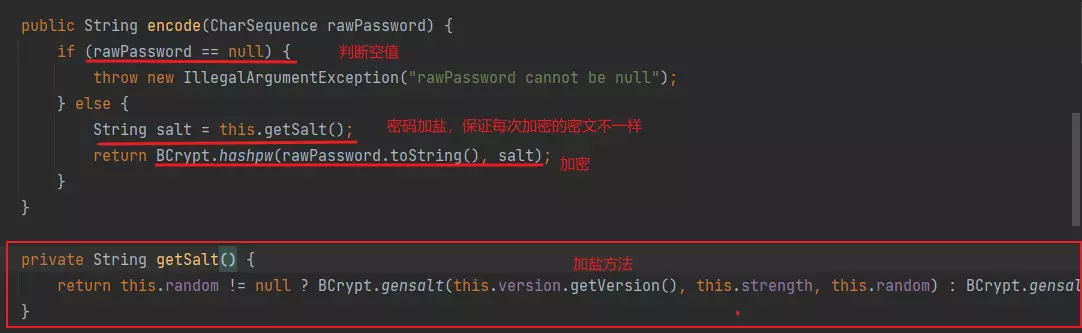
2. password加密
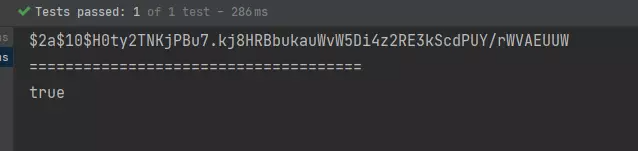
@Test
public void test21() {
    PasswordEncoder pw = new BCryptPasswordEncoder();
    String encode = pw.encode("123");
    System.out.println(encode);
    System.out.println("=====================================");
    boolean matches = pw.matches("123", encode);
    System.out.println(matches);
}
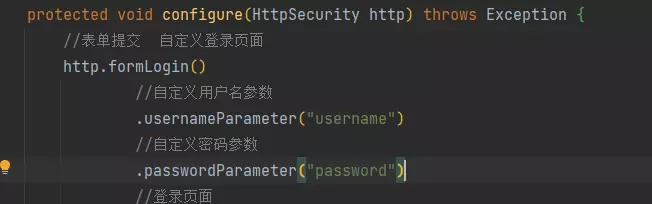
3. 自定义登录逻辑
把PasswordEncoder交给spring管理
@Configuration
public class SecurityConfig {

  @Bean
  public PasswordEncoder getPw(){
      return new BCryptPasswordEncoder();
  }
}
实现UserDetailsService 进行自定义登录逻辑 去数据库查询用户
@Service
@Slf4j
public class UserDetailServiceImpl implements UserDetailsService {

  @Autowired
  private UserService userservice;

  @Override
  public UserDetails loadUserByUsername(String userName) throws UsernameNotFoundException {
      //1.根据用户名去数据库查询,如果不存在抛UsernameNotFoundException异常
      User user = userservice.getByAccountName(userName);
      if (user != null) {
          //2.比较密码 把数据库加密的密码传入
          return new org.springframework.security.core.userdetails.User(userName, user.getPassword(), AuthorityUtils.commaSeparatedStringToAuthorityList("admin"));
      }
      log.error(userName + "账号不存在!");
      throw new UsernameNotFoundException("账号不存在!");
  }
}
4. 自定义登录页面
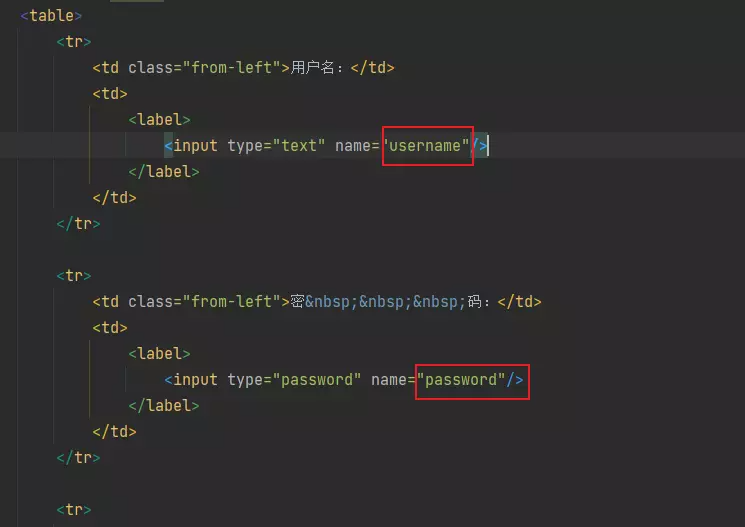
@Configuration
public class SecurityConfig extends WebSecurityConfigurerAdapter {

  @Bean
  public PasswordEncoder getPw() {
      return new BCryptPasswordEncoder();
  }

  @Override
  protected void configure(HttpSecurity http) throws Exception {
      //表单提交  自定义登录页面
      http.formLogin()
              //登录页面
              .loginPage("/login.html")
              //表单提交的接口
              .loginProcessingUrl("/login");

      //授权
      http.authorizeRequests()
              //放走登录页面
              .antMatchers("/login.html").permitAll()
              //所有请求都要认证才能访问,必须登录
              .anyRequest()
              .authenticated();

      //关闭csrf
      http.csrf()
              .disable();
  }
}
<form action="/login" method="POST">
<table>
<tr>
<td class="from-left">用户名:</td>
<td>
<label>
<input type="text" name="username"/>
</label>
</td>
</tr>
<tr>
<td class="from-left">密 码:</td>
<td>
<label>
<input type="password" name="password"/>
</label>
</td>
</tr>
<tr>
<td colspan="2"><input type="submit" value="登录"></td>
</tr>
</table>
</form>
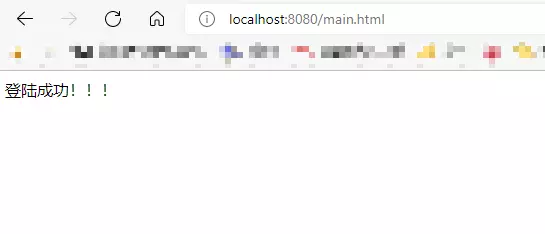
5. 登录成功和失败跳转
@Controller
public class LoginController {

    @RequestMapping(value = "/toMain",method = RequestMethod.POST)
    public String login() {
        return "redirect:main.html";
    }

    @RequestMapping(value = "/toError")
    public String error() {
        return "redirect:error.html";
    }
}
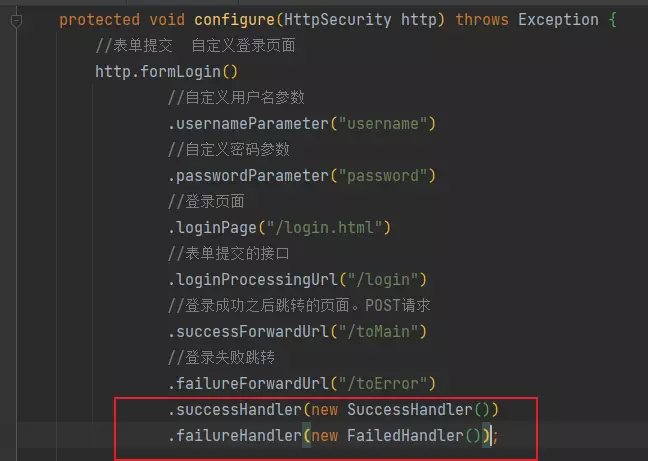
@Configuration
public class SecurityConfig extends WebSecurityConfigurerAdapter {

    @Bean
    public PasswordEncoder getPw() {
        return new BCryptPasswordEncoder();
    }

    @Override
    protected void configure(HttpSecurity http) throws Exception {
        //表单提交  自定义登录页面
        http.formLogin()
                //登录页面
                .loginPage("/login.html")
                //表单提交的接口
                .loginProcessingUrl("/login")
                //登录成功之后跳转的页面。POST请求
                .successForwardUrl("/toMain")
                //登录失败跳转
                .failureForwardUrl("/toError");

        //授权
        http.authorizeRequests()
                //放走登录页面
                .antMatchers("/login.html").permitAll()
                .antMatchers("/error.html").permitAll()
                //所有请求都要认证才能访问,必须登录
                .anyRequest()
                .authenticated();

        //关闭csrf
        http.csrf()
                .disable();
    }
}
6. 自定义参数
两个必须一致
7. 登录成功和登录失败自定义处理
实现各自的handler即可
public class SuccessHandler implements AuthenticationSuccessHandler {
    @Override
    public void onAuthenticationSuccess(HttpServletRequest httpServletRequest, HttpServletResponse httpServletResponse, Authentication authentication) throws IOException, ServletException {
        //登录成功处理
    }
}

public class FailedHandler implements AuthenticationFailureHandler {
    @Override
    public void onAuthenticationFailure(HttpServletRequest httpServletRequest, HttpServletResponse httpServletResponse, AuthenticationException e) throws IOException, ServletException {
        //登录失败处理
    }
}
8. 拦截与放行
通过antMatchers().permitAll()放行
通过antMatchers().hasAuthority()鉴权
hasRolo()鉴定角色
……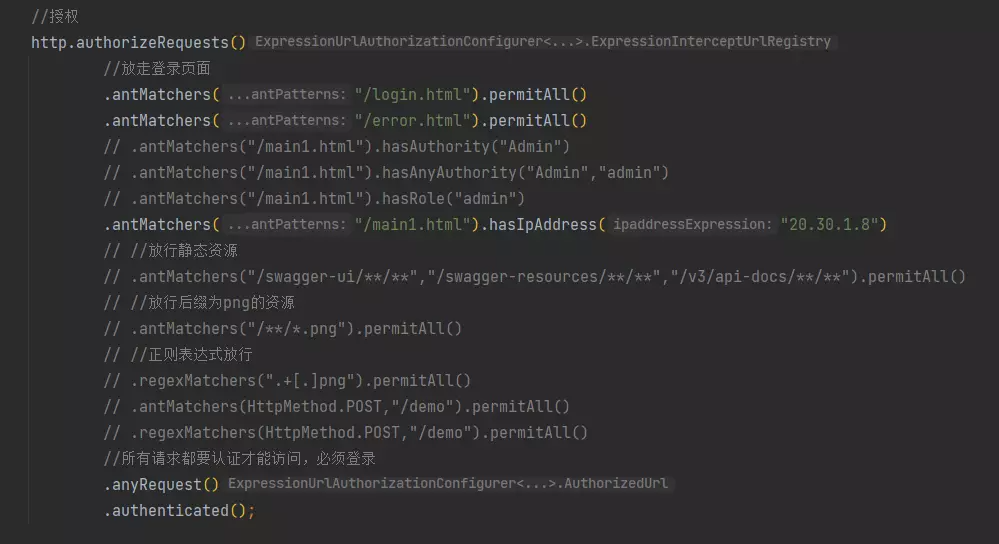
授权和放行底层使用的是access
.antMatchers("/main1.html").access("hasRole('admin')")
.antMatchers("/main1.html").access("permitAll")
9. 自定义access拦截方法
public interface MyAccessService {
    boolean hasPermission(HttpServletRequest request, Authentication authentication);
}


@Service
public class MyAccessServiceImpl implements MyAccessService {
    @Override
    public boolean hasPermission(HttpServletRequest request, Authentication authentication) {
        //获取主体
        Object principal = authentication.getPrincipal();
        if (principal instanceof UserDetails){
            UserDetails details = (UserDetails) principal;
            //获取权限
            Collection<? extends GrantedAuthority> authorities = details.getAuthorities();
            //判断请求URI是否存在于权限中
            return authorities.contains(new SimpleGrantedAuthority(request.getRequestURI()));
        }
        return false;
    }
}

.anyRequest().access("@myAccessServiceImpl.hasPermission(request,authentication)");
10. 自定义403页面
@Component
public class MyAccessDeniedHandler implements AccessDeniedHandler {
    @Override
    public void handle(HttpServletRequest request, HttpServletResponse response, AccessDeniedException e) throws IOException, ServletException {
        response.setStatus(HttpServletResponse.SC_FORBIDDEN);

        response.setHeader("Content-Type","application/json;charset=utf-8");
        PrintWriter writer = response.getWriter();
        writer.write("{\"status\":403,\"msg\":\"权限不足,请联系管理员!\"}");
        writer.flush();
        writer.close();
    }
}
//自定义403页面
http.exceptionHandling()
        .accessDeniedHandler(accessDeniedHandler);
11. 基于注解的权限访问控制
- 启动类添加注解开启
@EnableGlobalMethodSecurity(securedEnabled = true) - 接口上添加注解
如果有这个ROLE_Admin角色,正常访问,如果没有就报500@Secured("ROLE_Admin") @RequestMapping(value = "/toMain",method = RequestMethod.POST) public String login() { return "redirect:main.html"; }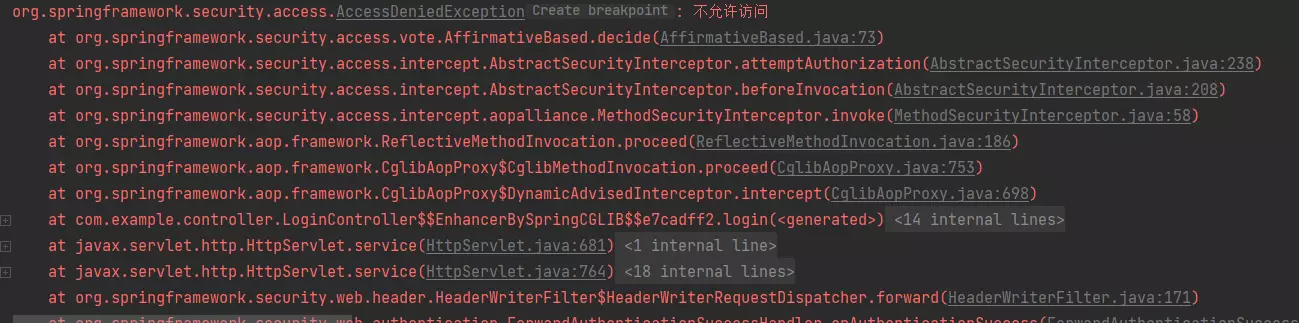
@PreAuthorize @PostAuthorize
都是方法或者类级别的注释- @PreAuthorize 表示在方法执行前或类执行前先判断权限,大多情况用的就是这个注解,注解的参数和access()方法参数取值相同,都是权限表达式。
- @PostAuthorize 表示方法或者类执行结束后判断权限,此注解很少被使用到
- 使用:
@EnableGlobalMethodSecurity(securedEnabled = true, prePostEnabled = true)


@PreAuthorize("hasRole('admin')")
@RequestMapping(value = "/toMain",method = RequestMethod.POST)
public String login() {
    return "redirect:main.html";
}
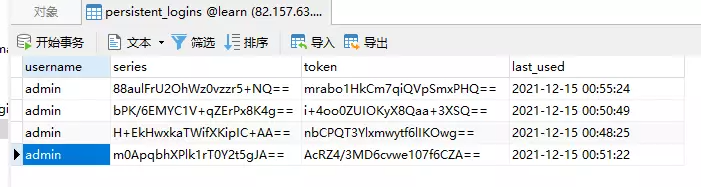
12. remember-me功能
//记住我
http.rememberMe()
        //设置数据源
        .tokenRepository(persistentTokenRepository)
        //记住我参数
        //.rememberMeParameter("")
        //超时时间
        .tokenValiditySeconds(60)
        //自定义登录逻辑
        .userDetailsService(userDetailService);


@Bean
public PersistentTokenRepository persistentTokenRepository() {
    JdbcTokenRepositoryImpl jdbcTokenRepository = new JdbcTokenRepositoryImpl();
    //设置数据源
    jdbcTokenRepository.setDataSource(dataSource);
    //自动建表,第一次启动时开启,第二次启动时注释掉
    // jdbcTokenRepository.setCreateTableOnStartup(true);
    return jdbcTokenRepository;
}
13. 退出登录
//退出登录
http.logout()
        //退出成功跳转页面
        .logoutSuccessUrl("/login.html");

14. CSRF
默认开启状态,要在参数中携带登录获取到的token才可以正常访问,不然报403权限不足。
参数名:_csrf 参数值:_csrf.token
4. Oauth2
1. 简介
优点:
- 更安全,客户端不接触密码,服务端更容易集中保护
- 广泛传播并被持续采用
- 短寿命和封装的token
- 资源服务器和授权服务器解耦
- 集中式授权,简化客户端
- HTTP/JSON友好,易于请求和传递token
- 考虑多种客户端架构场景
客户可以具有不同的信任级别
缺点:协议框架太宽泛,造成各种实现的兼容性和操作性差
- 不是一个认证协议,本身不能告诉你任何用户信息
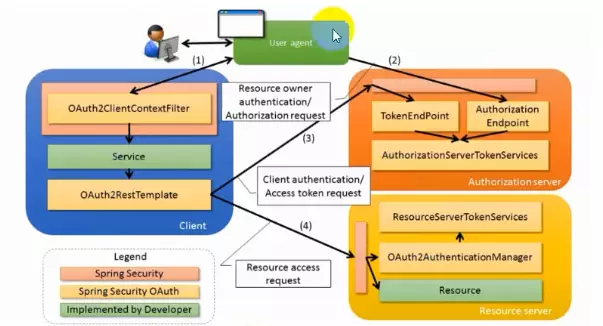
2. SpringSecurity oauth2
架构
环境搭建
- 依赖
<?xml version="1.0" encoding="UTF-8"?>
<project xmlns="http://maven.apache.org/POM/4.0.0" xmlns:xsi="http://www.w3.org/2001/XMLSchema-instance"
         xsi:schemaLocation="http://maven.apache.org/POM/4.0.0 https://maven.apache.org/xsd/maven-4.0.0.xsd">
    <modelVersion>4.0.0</modelVersion>
    <parent>
        <groupId>org.springframework.boot</groupId>
        <artifactId>spring-boot-starter-parent</artifactId>
        <version>2.6.1</version>
        <relativePath/> <!-- lookup parent from repository -->
    </parent>
    <groupId>com.example</groupId>
    <artifactId>springsecurityoauth2-demo</artifactId>
    <version>0.0.1-SNAPSHOT</version>
    <name>springsecurityoauth2-demo</name>
    <description>springsecurityoauth2-demo</description>

    <properties>
        <java.version>1.8</java.version>
        <spring-cloud.version>Greenwich.SR6</spring-cloud.version>
    </properties>
    <dependencies>
        <dependency>
            <groupId>org.springframework.cloud</groupId>
            <artifactId>spring-cloud-starter-oauth2</artifactId>
        </dependency>

        <dependency>
            <groupId>org.springframework.cloud</groupId>
            <artifactId>spring-cloud-starter-security</artifactId>
        </dependency>

        <dependency>
            <groupId>org.springframework.boot</groupId>
            <artifactId>spring-boot-starter-web</artifactId>
        </dependency>

        <dependency>
            <groupId>org.springframework.boot</groupId>
            <artifactId>spring-boot-starter-test</artifactId>
            <scope>test</scope>
        </dependency>
    </dependencies>

    <dependencyManagement>
        <dependencies>
            <dependency>
                <groupId>org.springframework.cloud</groupId>
                <artifactId>spring-cloud-dependencies</artifactId>
                <version>${spring-cloud.version}</version>
                <type>pom</type>
                <scope>import</scope>
            </dependency>
        </dependencies>
    </dependencyManagement>

    <build>
        <plugins>
            <plugin>
                <groupId>org.springframework.boot</groupId>
                <artifactId>spring-boot-maven-plugin</artifactId>
            </plugin>
        </plugins>
    </build>

</project>
- 配置文件
package com.example.demo.config;

import org.springframework.context.annotation.Bean;
import org.springframework.context.annotation.Configuration;
import org.springframework.security.config.annotation.web.builders.HttpSecurity;
import org.springframework.security.config.annotation.web.configuration.EnableWebSecurity;
import org.springframework.security.config.annotation.web.configuration.WebSecurityConfigurerAdapter;
import org.springframework.security.crypto.bcrypt.BCryptPasswordEncoder;
import org.springframework.security.crypto.password.PasswordEncoder;

/**
 * <p>项目名称: springsecurityoauth2-demo </p>
 * <p>包名称: com.example.demo.config </p>
 * <p>描述:  </p>
 * <p>  </p>
 * <p>创建时间: 2021/12/16 14 </p>
 *
 * @author 王祁
 * @version v1.0
 * @update [序号][日期YYYY-MM-DD] [更改人姓名][变更描述]
 */
@Configuration
@EnableWebSecurity
public class SecurityConfig extends WebSecurityConfigurerAdapter {
    @Bean
    public PasswordEncoder getPw(){
        return new BCryptPasswordEncoder();
    }


    @Override
    protected void configure(HttpSecurity http) throws Exception {
        http.authorizeRequests()
                //放行需要的接口  其余都拦截
                .antMatchers("/oauth/**","/login/**","/logout/**")
                .permitAll()
                .anyRequest()
                .authenticated()
                //放行表单请求
                .and()
                .formLogin()
                .permitAll()
                //关闭守护
                .and()
                .csrf().disable();
    }
}
- 授权服务器配置类
package com.example.demo.config;
import org.springframework.context.annotation.Configuration;
import org.springframework.security.oauth2.config.annotation.configurers.ClientDetailsServiceConfigurer;
import org.springframework.security.oauth2.config.annotation.web.configuration.AuthorizationServerConfigurerAdapter;
import org.springframework.security.oauth2.config.annotation.web.configuration.EnableAuthorizationServer;
/**
* <p>项目名称: springsecurityoauth2-demo </p>
* <p>包名称: com.example.demo.config </p>
* <p>描述: 授权服务器配置类 </p>
* <p> 授权服务器配置类 </p>
* <p>创建时间: 2021/12/16 14 </p>
*
* @author 王祁
* @version v1.0
* @update [序号][日期YYYY-MM-DD] [更改人姓名][变更描述]
*/
@Configuration
@EnableAuthorizationServer
public class AuthorizationServerConfig extends AuthorizationServerConfigurerAdapter {
@Override
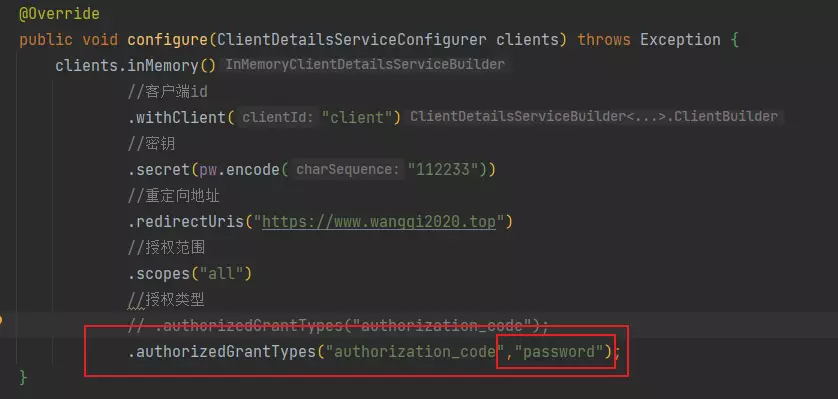
public void configure(ClientDetailsServiceConfigurer clients) throws Exception {
clients.inMemory()
//客户端id
.withClient("client")
//密钥
.secret("112233")
//重定向地址
.redirectUris("https://www.wangqi2020.top")
//授权范围
.scopes("all")
//授权类型
.authorizedGrantTypes("authorization_code");
}
}
- 资源服务器配置
package com.example.demo.config;

import org.springframework.context.annotation.Configuration;
import org.springframework.security.config.annotation.web.builders.HttpSecurity;
import org.springframework.security.oauth2.config.annotation.web.configuration.EnableResourceServer;
import org.springframework.security.oauth2.config.annotation.web.configuration.ResourceServerConfigurerAdapter;

/**
 * <p>项目名称: springsecurityoauth2-demo </p>
 * <p>包名称: com.example.demo.config </p>
 * <p>描述: 资源服务器配置 </p>
 * <p> 资源服务器配置 </p>
 * <p>创建时间: 2021/12/16 14 </p>
 *
 * @author 王祁
 * @version v1.0
 * @update [序号][日期YYYY-MM-DD] [更改人姓名][变更描述]
 */
@Configuration
@EnableResourceServer
public class ResourceServerConfig extends ResourceServerConfigurerAdapter {
    @Override
    public void configure(HttpSecurity http) throws Exception {
        http.csrf().disable()
                .authorizeRequests()
                .anyRequest()
                .authenticated()
                .and()
                .requestMatchers()
                .antMatchers("/user/**");
    }
}
- service 自定义登录逻辑
package com.example.demo.service;

import com.example.demo.pojo.User;
import org.springframework.beans.factory.annotation.Autowired;
import org.springframework.security.core.authority.AuthorityUtils;
import org.springframework.security.core.userdetails.UserDetails;
import org.springframework.security.core.userdetails.UserDetailsService;
import org.springframework.security.core.userdetails.UsernameNotFoundException;
import org.springframework.security.crypto.password.PasswordEncoder;
import org.springframework.stereotype.Service;

/**
 * <p>项目名称: springsecurityoauth2-demo </p>
 * <p>包名称: com.example.demo.service </p>
 * <p>描述:  </p>
 * <p>  </p>
 * <p>创建时间: 2021/12/16 14 </p>
 *
 * @author 王祁
 * @version v1.0
 * @update [序号][日期YYYY-MM-DD] [更改人姓名][变更描述]
 */
@Service
public class UserService implements UserDetailsService {
    @Autowired
    private PasswordEncoder passwordEncoder;
    @Override
    public UserDetails loadUserByUsername(String username) throws UsernameNotFoundException {
        String encode = passwordEncoder.encode("1234");
        return new User(username,encode, AuthorityUtils.commaSeparatedStringToAuthorityList("admin"));
    }
}
- User类
package com.example.demo.pojo;

import org.springframework.security.core.AuthenticatedPrincipal;
import org.springframework.security.core.Authentication;
import org.springframework.security.core.GrantedAuthority;
import org.springframework.security.core.userdetails.UserDetails;

import java.util.Collection;
import java.util.List;

/**
 * <p>项目名称: springsecurityoauth2-demo </p>
 * <p>包名称: com.example.demo.pojo </p>
 * <p>描述:  </p>
 * <p>  </p>
 * <p>创建时间: 2021/12/16 14 </p>
 *
 * @author 王祁
 * @version v1.0
 * @update [序号][日期YYYY-MM-DD] [更改人姓名][变更描述]
 */
public class User implements UserDetails {
    private String username;
    private String password;
    private List<GrantedAuthority> authorities;

    public User(String username, String password, List<GrantedAuthority> authorities) {
        this.username = username;
        this.password = password;
        this.authorities = authorities;
    }

    @Override
    public Collection<? extends GrantedAuthority> getAuthorities() {
        return authorities;
    }

    @Override
    public String getPassword() {
        return password;
    }

    @Override
    public String getUsername() {
        return username;
    }

    @Override
    public boolean isAccountNonExpired() {
        return true;
    }

    @Override
    public boolean isAccountNonLocked() {
        return true;
    }

    @Override
    public boolean isCredentialsNonExpired() {
        return true;
    }

    @Override
    public boolean isEnabled() {
        return true;
    }
}
- controller层
package com.example.demo.controller;
import org.springframework.security.core.Authentication;
import org.springframework.web.bind.annotation.RequestMapping;
import org.springframework.web.bind.annotation.RestController;
/**
*
* <p>项目名称: springsecurityoauth2-demo </p>
* <p>包名称: com.example.demo.controller </p>
* <p>描述: </p>
* <p> </p>
* <p>创建时间: 2021/12/16 14 </p>
*
* @author 王祁
* @version v1.0
* @update [序号][日期YYYY-MM-DD] [更改人姓名][变更描述]
*/
@RestController
@RequestMapping("user")
public class UserController {
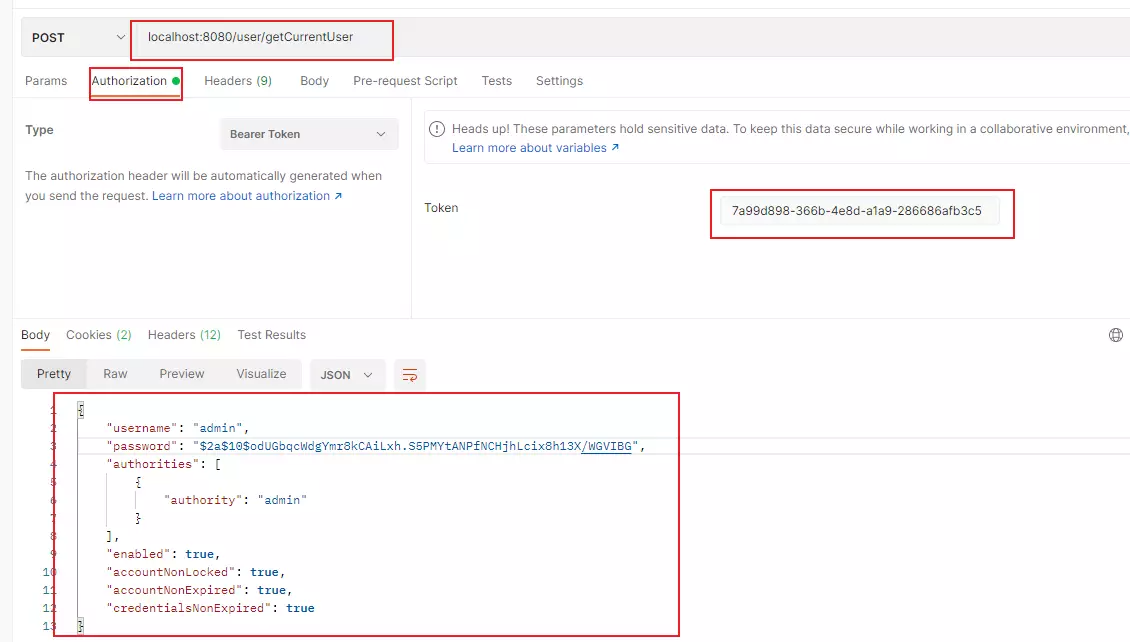
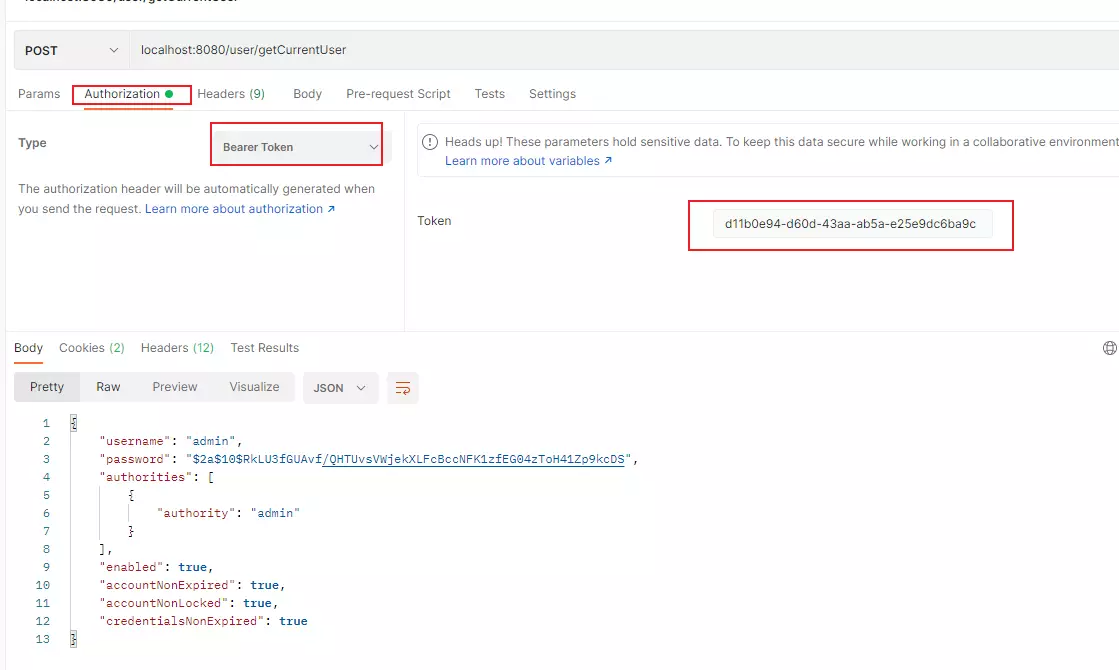
@RequestMapping("/getCurrentUser")
public Object getCurrentUser(Authentication authentication){
return authentication.getPrincipal();
}
}
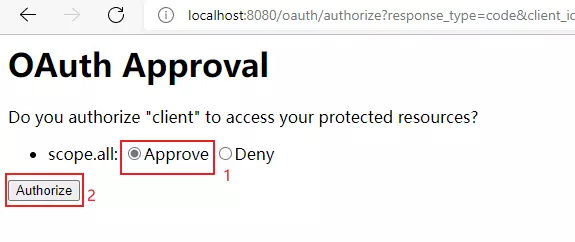
2.1 授权码模式
浏览器输入:
http://localhost:8080/oauth/authorize?response_type=code&client_id=client&redirect_uri=https://www.wangqi2020.top&scope=all 填写该填写的然后回车就会出现登录页面,user 1234登录以后出现:


复制code=mghzYw
打开postman


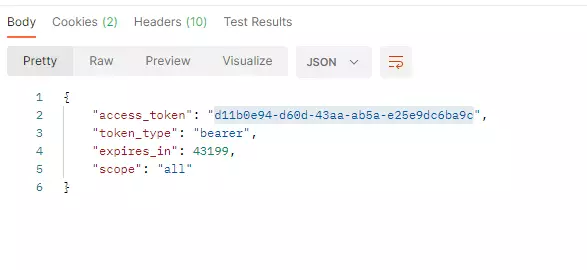
token = a3113ff0-68ee-4d8d-a914-3481459dbba7
然后携带token作为Bearer Token访问资源
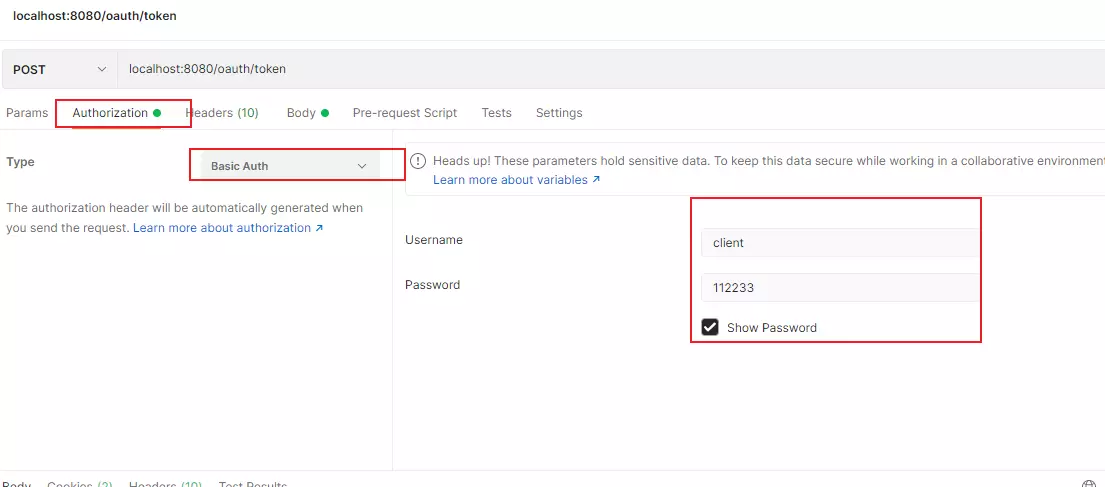
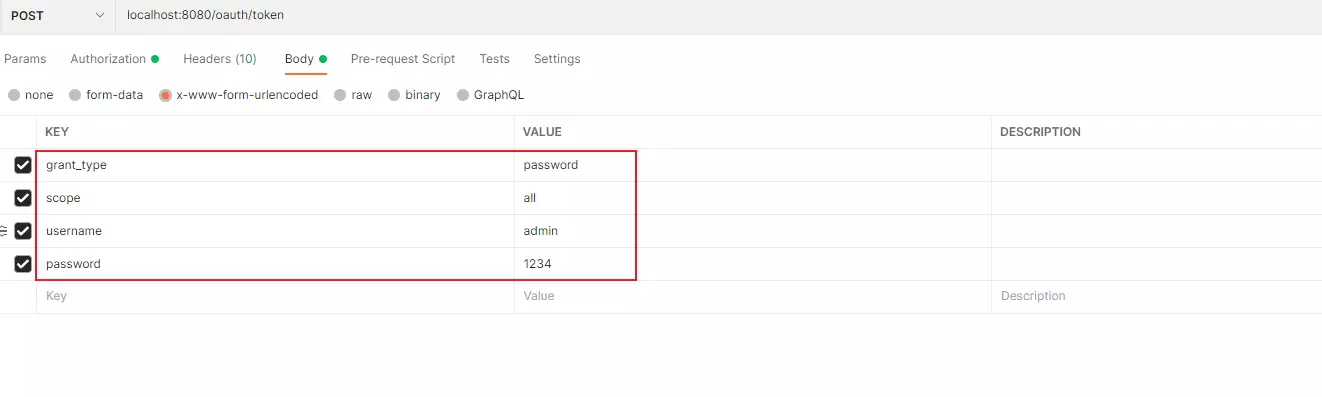
2.2 密码模式
- 在SecurityConfig中加入Bean
@Override @Bean public AuthenticationManager authenticationManager() throws Exception { return super.authenticationManager(); } - 在授权服务器的配置类中重写configure
@Autowired
private AuthenticationManager authenticationManager;

@Autowired
private UserService userDetailsService;

@Override
public void configure(AuthorizationServerEndpointsConfigurer endpoints) throws Exception {
    endpoints.authenticationManager(authenticationManager)
            .userDetailsService(userDetailsService);
}
- 授权模式改为密码或者添加密码模式
5. Redis存储Token
之前代码是存在与内存中,这在生产环境中不合理,下边我们将它存入Redis
5.1 添加依赖
<dependency>
    <groupId>org.springframework.boot</groupId>
    <artifactId>spring-boot-starter-data-redis</artifactId>
</dependency>

<dependency>
    <groupId>org.apache.commons</groupId>
    <artifactId>commons-pool2</artifactId>
</dependency>
- 使用密码模式
@Autowired
@Qualifier("redisTokenStore")
private TokenStore redisTokenStore;

/**
 * 密码模式
 * @param endpoints
 * @throws Exception
 */
@Override
public void configure(AuthorizationServerEndpointsConfigurer endpoints) throws Exception {
    endpoints.authenticationManager(authenticationManager)
            .userDetailsService(userDetailsService)
            .tokenStore(redisTokenStore);
}
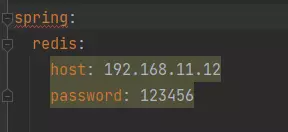
redis配置
@Configuration
public class RedisConfig {

  @Autowired
  private RedisConnectionFactory factory;

  @Bean
  public TokenStore redisTokenStore(){
      return new RedisTokenStore(factory);
  }
}
application.yml
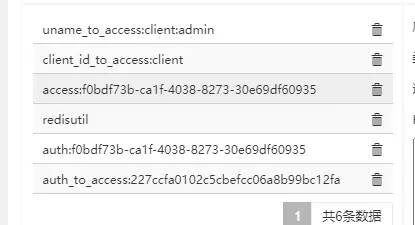
按照密码模式去访问,redis中多了数据
6. JWT
1. 简介
JSON Web Token(JWT)是一个开放的行业标准,它定义了一种简介的、自包含的协议格式,用于在通信双方传递json对象,传递的信息经过数字签名可以被验证和信任。JWT可以使用HMAC算法或使用RSA的公钥/私钥来签名,防止被篡改。
2. 优点
- jwt基于json,非常方便解析
- 可以在令牌中自定义丰富的内容,易扩展。
- 通过非对称加密算法和数字签名技术,JWT防止篡改,安全性高 。
- 资源服务使用JWT可不依赖认证服务即可完成授权。
3. 缺点
jwt令牌较长,占存储空间比较大。
4. demo
<?xml version="1.0" encoding="UTF-8"?>
<project xmlns="http://maven.apache.org/POM/4.0.0" xmlns:xsi="http://www.w3.org/2001/XMLSchema-instance"
         xsi:schemaLocation="http://maven.apache.org/POM/4.0.0 https://maven.apache.org/xsd/maven-4.0.0.xsd">
    <modelVersion>4.0.0</modelVersion>
    <parent>
        <groupId>org.springframework.boot</groupId>
        <artifactId>spring-boot-starter-parent</artifactId>
        <version>2.5.7</version>
        <relativePath/> <!-- lookup parent from repository -->
    </parent>
    <groupId>com.example</groupId>
    <artifactId>jwt-demo</artifactId>
    <version>0.0.1-SNAPSHOT</version>
    <name>jwt-demo</name>
    <description>jwt-demo</description>
    <properties>
        <java.version>1.8</java.version>
    </properties>
    <dependencies>
        <dependency>
            <groupId>org.springframework.boot</groupId>
            <artifactId>spring-boot-starter-web</artifactId>
        </dependency>

        <dependency>
            <groupId>io.jsonwebtoken</groupId>
            <artifactId>jjwt</artifactId>
            <version>0.9.1</version>
        </dependency>


        <dependency>
            <groupId>org.springframework.boot</groupId>
            <artifactId>spring-boot-starter-test</artifactId>
            <scope>test</scope>
            <exclusions>
                <exclusion>
                    <groupId>org.junit.vintage</groupId>
                    <artifactId>junit-vintage-engine</artifactId>
                </exclusion>
            </exclusions>
        </dependency>
    </dependencies>

    <build>
        <plugins>
            <plugin>
                <groupId>org.springframework.boot</groupId>
                <artifactId>spring-boot-maven-plugin</artifactId>
            </plugin>
        </plugins>
    </build>

</project>
package com.example.jwtdemo;

import io.jsonwebtoken.Claims;
import io.jsonwebtoken.JwtBuilder;
import io.jsonwebtoken.Jwts;
import io.jsonwebtoken.SignatureAlgorithm;
import io.jsonwebtoken.impl.Base64Codec;
import org.junit.jupiter.api.Test;
import org.springframework.boot.test.context.SpringBootTest;
import sun.misc.BASE64Decoder;

import java.io.IOException;
import java.util.Arrays;
import java.util.Date;

@SpringBootTest
class JwtDemoApplicationTests {

    @Test
    void contextLoads() throws IOException {
        long l = System.currentTimeMillis();
        int i = 60 * 1000;
        long data = l + i;
        JwtBuilder jwtBuilder = Jwts.builder()
                //唯一id
                .setId("888")
                //接收的用户
                .setSubject("Rose")
                //签发时间
                .setIssuedAt(new Date())
                //签名算法及密钥
                .signWith(SignatureAlgorithm.HS256, "xxxx")
                .setExpiration(new Date(data));

        String token = jwtBuilder.compact();
        System.out.println(token);
        String[] split = token.split("\\.");
        String head = Base64Codec.BASE64.decodeToString(split[0]);
        System.out.println("head:"+head);

        String pload = Base64Codec.BASE64.decodeToString(split[1]);
        System.out.println("pload:"+pload);

        String pload1 = Base64Codec.BASE64.decodeToString(split[2]);
        System.out.println("pload1:"+pload1);

        //eyJhbGciOiJIUzI1NiJ9.eyJqdGkiOiI4ODgiLCJzdWIiOiJSb3NlIiwiaWF0IjoxNjM5NjQ2Nzg2fQ.mN0AvULg2-o-GDIxuUZfkEwATXaIY1-xEnapLIRtYG8

    }


    @Test
    public void test1(){
        String token = "eyJhbGciOiJIUzI1NiJ9.eyJqdGkiOiI4ODgiLCJzdWIiOiJSb3NlIiwiaWF0IjoxNjM5NjQ3OTczLCJleHAiOjE2Mzk2NDgwMzN9.IISjwR-iLbETC7FGEOWS9wDGgGamiLrv9Tj7t1L3IBY";
        Claims o = (Claims) Jwts.parser()
                .setSigningKey("xxxx")
                .parse(token)
                .getBody();

        System.out.println(o.getSubject());
        System.out.println(o.getExpiration());
        System.out.println(o.getId());
        System.out.println(o.getIssuedAt());
    }

}
- 本文标签: Spring Boot
- 本文链接: https://blog.wangqi2020.top/article/50
- 版权声明: 本文由王祁原创发布,转载请遵循《署名-非商业性使用-相同方式共享 4.0 国际 (CC BY-NC-SA 4.0)》许可协议授权